A moiré pattern is an artifact that occurs in the print reproduction process when any two, or more, repeating patterns overlap each other.
Moiré in the print reproduction process is similar to the distortion effect on television when a presenter's clothing includes a striped or crisscross pattern as in the gentleman's shirt in the short video below from the WhatTheyThink.com website:
Click image to play
It that case, the presenter's stripe patterned shirt is "harmonically beating" i.e. has a similar frequency and angle to the video camera's sensor and/or the pixels on the computer's display. This results in the appearance of a secondary pattern or "moiré."
The most common types of moiré encountered in the print production process.
Scanning/sampling moiré
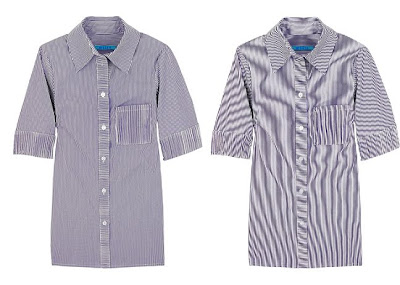
These artifacts are caused by the frequency/angle of the scanner sensor (flat bed and drum scanners, or digital camera sensor) harmonically beating with a pattern in the object being scanned. In this case the artwork ends up having the moiré embedded in it and is part of the image. For example, the original pattern in the pinstriped shirt below (left) acquires a moiré pattern when scanned (right).
If you encounter this type of moiré, there is a Photoshop technique developed by John Wheeler that may help you eliminate it. The tutorial is here: http://tinyurl.com/3mmzv4h
Moiré can also be introduced when a halftone printed image is scanned. In the picture below, the top image is how the photograph in a magazine appears to the eye and below it the result when the image is scanned.
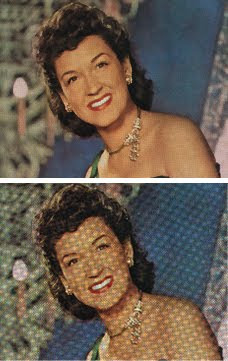
In this case, the moiré is caused by the halftone dots in the magazine reproduction harmonically beating with the scanner's CCD array.
Subject moiré
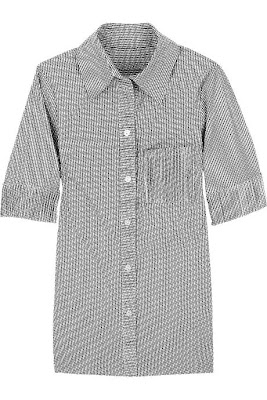
These artifacts are caused when the halftone screen that is being used to reproduce the image on press harmonically beats with a pattern in the image being reproduced as in the example of the striped shirt below:
This artifact is sometimes referred to as "screening moiré" since it is the halftone screen that is causing the problem. However, I use the term "screening moiré" to refer to a different problem - see below.
Screening moiré
Screening moiré, which is a term that is sometimes confused with subject moiré, is actually an artifact caused by either an inappropriate or incorrect halftone screen angle within a CMYK image. With modern screening systems this is rarely a problem. What is most likely to happen is that a screening moiré that is already present is somehow made more visible. For example, the image at left below is a blow-up of a screen tint made of Yellow and Cyan. Because the Y and C screen angles are less than 30° apart they create a moiré. However, because Yellow is so much lighter than Cyan the moiré is not normally visible.
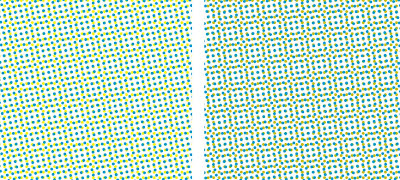
However, if the Yellow printer becomes contaminated, as at right above, the existing moiré can become very visible.
Another cause of screening moiré can occur if a prescreened (bitmap) graphic is imaged on a device that has a different resolution than the original art. In the below example a prescreened image that was created at 2400 dpi (standard for North American imagesetters) has been imaged on a 2540 dpi device (standard for the rest of the world):
The result is a severe moiré in what should be a flat background screen tone.
Resampling moiré
Moiré artifacts can be introduced when images are resampled (have their resolution changed) somewhere in the production process.
 Original resolution car grill at left. Resampled car grill at right.
Moiré, caused by resampling, usually occurs if the image is resized in a page layout program, or when the document is exported as a PDF, or as a result of the RIP settings when the document is processed by prepress.
 Obscure moirés
These moirés are fairly rare, but do happen. When other explanations fail, these causes may be worth investigating.
Demosaicing moiré
On rare occasions you may encounter a "demosaicing" moiré. These occur when images with small-scale detail near the resolution limit of the digital sensor in a digital camera sometimes cause the demosaicing algorithm to produce repeating patterns, color artifacts or pixels arranged in an unrealistic maze-like pattern. On the left a properly demosaiced image, and on the right one in which the demosaicing algorithm has caused colored moiré artifacts in the fence and side of the building:
 Click image to enlarge
Single channel moiré
Click image to enlarge
Single channel moiré
The standard photomechanical screen angles do not work best with digital screens. As a result some output device, halftone dot shape, screen angle and frequency combinations can result in moiré within one screen resulting in "single channel moiré."
One solution to avoid this problem was the development of shifted angles. The angular distance between screen angles remains more or less the same however all the angles are shifted by 7.5°. This has the effect of adding "noise" to the halftone screen and hence eliminating the moiré. For that reason, some individual screen sets may vary the requested screen angles slightly in order to overcome the potential for single channel moiré.
Paper related moiré
During the paper manufacturing process the side of a sheet paper that is in contact with the wire or forming fabric of the paper machine is the wire side (also called the reverse or bottom side). The wire side is usually not quite as smooth as the top or felt side and may carry a subtle impression of the wire pattern. If that pattern harmonically beats with the halftone screen pattern a subtle moiré will appear in the presswork. It often appears, and is confused, as a mottle. The difference is that mottling appears as random splotches while wire side paper related moiré appears as splotches that form a periodic pattern.
Avoiding moiré
One of the unfortunate effects of the use of inkjet proofing is that moiré artifacts are no longer detected during proofing cycles where there is an opportunity to deal with them. Instead, they are usually first seen on press at which point the job may need to be stopped resulting in increased costs and schedule disruption.
While the geometries of moiré formation are well understood, I'm not aware of any prepress system that incorporates moiré detection/prediction during document processing. So, the key thing is that print specifiers and prepress technicians have to take responsibility to reduce the likelihood of moirés occurring in the first place as well as being aware of image types that have the potential to form moiré artifacts.
Tips for avoiding scanning/sampling moiré
1- Use descreening software if your scanner application has this option.
2- Try scanning at a resolution equal to the halftone lpi used for the printed image.
 Left image scanned at 600 dpi and rescreened. Right image scanned at 150 dpi (same as printed) ready for rescreening.
3-
Left image scanned at 600 dpi and rescreened. Right image scanned at 150 dpi (same as printed) ready for rescreening.
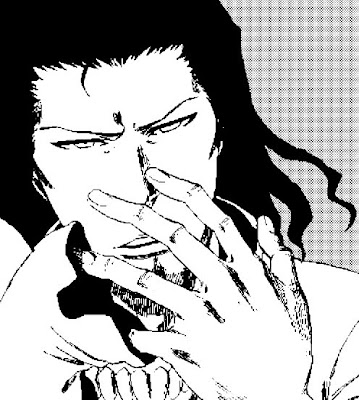
3- Try scanning the image by placing and scanning the original at different angles.
 Left image scanned at 90° shows moiré on face. Right image scanned at 30° - no moiré on face.
Tips for avoiding subject moiré
1-
Left image scanned at 90° shows moiré on face. Right image scanned at 30° - no moiré on face.
Tips for avoiding subject moiré
1- Identify images with the potential for moiré. If the prepress workflow allows it, export the processed halftoned bitmap files of the suspect images. Proof them by viewing at 100% on a monitor or outputting to a laser printer at a magnification equal to the resolution of the printer. (e.g. if the bitmap is 2400 dpi, and the laser printer is 600 dpi, then output the bitmap at 400% (2400/600 = 4)). View the proofs on screen or on paper from a distance to see if a moiré is present.
2- Use FM/stochastic screening. Because this type of screening has no frequency or angle it avoids subject moiré completely.
3- Use FM/stochastic screening for the screen that is causing the subject moiré - typically it's the black printer.
4- Swap screen angles usually the black for magenta.
5- Change separation method to UCR instead of GCR.
Tips for avoiding screening moiré
1- Use FM/stochastic screening for the yellow printer. If you're using a 150-200 lpi AM/XM screen then use a 35 micron FM/stochastic since it will have a similar dot gain curve.
2- Make sure that incoming halftone screened bitmap files have a resolution that is equal to or an even divisor of the resolution of the output device. Make sure that those bitmapped images have not been resized in a page layout application.
Tips for avoiding resampling moiré
1- Import images into page layout applications at 100% - do not resize in the application.
2- Images should have a resolution that is an equal divisor of the output device. E.g. 300/400/600 dpi are even divisors of 2,400 dpi.
3- Make sure that PDF creation applications are set to
not resample images.
 PDF creation settings
4-
PDF creation settings
4- Make sure that prepress RIP settings are set to
not resample images.


